
Guide to Wildstar’s Housing

Normally I write things about Wildstar for Wildstar Radio, but I feel this blog has been neglected. So, while I write PvP articles for them, I’ll write guides here for other things.
Wildstar’s housing system is the best housing system I have ever seen. It is not only deep and varied in what it can do, but it was literally built into the game from the ground up. Everything in the game relates to housing in some way or another; it is not an afterthought.
Wildstar’s housing basically consists of a plot of land floating in the sky. It is instanced, which at first seems closed off, but it really isn’t. There is an in-depth neighboring system that allows you to visit friends on their housing plot and have visitors to yours! Because of the instancing, there can be a much higher decor limit, allowing players to get really creative with their decor.
This guide will cover how to get a house, how to customize it, how to use the Housing UI, how to tweak your decor just right, how to deal with the neighbors, and what addons are useful to a housing aficionado. There’s a table of contents with links after the jump.
LAST UPDATED: 7/16/14
- Getting a house
- Types of housing items
- Sources of decor
- Housing UI
- Editor
- Buffs
- Neighbors
- Addons
- Websites
Getting a house (Back to Top)
To purchase your first house, you must reach level 14. At that level, you will get a quest when you go to your capital city, Thayd for Exiles and Illium for Dominion.
The quest eventually leads you to a hologram of a house that you can click to go to your housing map. After that, you will be given a skill in your teleports menu that will take you to your house on a 20 minute cooldown. But don’t worry! If that skill is on cooldown, you can always go back to that hologram to visit your house. When you use the housing teleport skill, it saves the place in the world where you were when you used the skill, so when you step on the teleporter at the corner of your housing plot, it will take you right back to where you were so you can continue questing.

You can begin to place decor items on your housing plot as soon as you get up to your housing map. You will have to purchase your actual house though, unless you have the preorder house, in which case, it is free. Houses come in two different sizes right now, “cozy” and “spacious.” The former costs 1 gold to build, while the second costs a whopping 3 platinum (300 gold).
We’ll talk about how you go about building your house and the various plugs soon. But first, let’s discuss the different types of items you can add to your house.
Types of housing items (Back to Top)
Decor (Back to Top)
The first type of item you can have is Decor items. Decor items are free-placed items that can be moved, rotated, scaled, and saved for later use. They can go basically anywhere on your housing plot (though certain areas may be off-limits depending on how your actual house is affecting those areas).
Decor items can found in a number of ways in the world, and we’ll talk about those ways soon. An important thing to know, however, is that you can always right-click on the decor in your bag, and it will permanently add it to your housing plot’s “Crate,” which makes it available to you to place when you get to your house. The cool thing is, you don’t actually have to be at your house to add it to your crate, so always click on Decor items you want so they don’t take up valuable bag space.
Improvements (Back to Top)
Improvements (or “plugs”) are stationary enhancements to your housing plot that are more permanent than Decor. Improvements usually give a cool feature to your housing plot, but you can only have six, two big ones and four little ones. Because of the inability to do everything, it encourages you to find friends and become neighbors with them so you get benefits from their plugs as well, and you can specialize in different things.
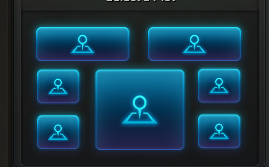
As can be seen above, the space in the middle (called a 2×2 plug) is where your house goes. The two spaces in the back (or top, depending how you look at it) are the large, or 1×2, plugs. The other four spaces on the sides are 1×1 plugs, and they hold a variety of different features.
Types of plugs (Back to Top)
There are basically six major types of plugs: Biomes, Challenges, Expeditions, Utility, Resource, and Cosmetic.
Biomes are large 1×2 improvements, and they are basically small pieces of land from a zone on Nexus, complete with a portal to the zone and music from the zone while you are standing near it.
Challenges come in both 1×2 and 1×1 varieties, and they give the typical slot-machine-style reward from the list of two housing items, 150 renown, or a dye box. This is also the only known way to get renown while solo, albeit slowly compared to a dungeon run. These challenges are on a 30-minute (in-game time) cooldown.
Expeditions are mini-instances that scale to your level and your group size. At the end, they give a reward of housing items, dyes, etc. There are four currently in the game, and they are all 1×1 sized.
Utility plugs can vary in function, but there are options for a crafting table, bank, vendor, buff statue etc. These are (from what I’ve seen) 1×1 plugs.
Resource plugs are for the various crafting gathering skills (mining, survivalist, and relic-hunting), the gardening hobby, and food (yes, the health regen food). You can only have one gathering plug per house, even if you have more than one gathering tradeskill, e.g. a survivalist thicket prevents you from adding a mine. You can always have a garden (since it is a hobby). The food comes from the Festival plug, which you get from doing your path missions. You can visit your friends to use theirs, and there are options for how much you want to share with other people that come to visit and who you want to be able to use your resource plugs at all. Everything has a respawn timer, but it does just sit there when you are offline, so setting up a 75%/25% split is still really good returns while you aren’t doing a thing. All of these are 1×1 plugs.
Finally, we have cosmetic plugs that don’t really do anything, but are just fun to have. Some of them have little things to use that give you an interesting temporary buff or something like that. These can be 1×1 or 1×2 plugs.
FABKits (Back to Top)
All Improvements require an item called a FABKit to create them. Once it is created, the FABKit is consumed, and you’ll need to obtain another one if you want to move it or replace it. You can only have one of a particular Improvement at a time, even if you have multiple FABKits. FABKits are not added to the Crate, so they do take up inventory space until they are added to your plot.
FABKits come from a variety of places, some of which we will talk about in the next section!
Sources of decor and improvements
(Back to Top)
Drops (Back to Top)
Most FABKits and decor items can be found in specific places in game, but there are definitely some that you have to get lucky on and see drop. Another way you can come by these items is by purchasing them on the Auction House.
On Jabbithole.com, you can see which mobs have the highest drop rate for a particular item.
Challenges (Back to Top)
One of the best ways to get the cooler housing items is by doing challenges in the world and on housing challenge plugs. Some of these are the hardest reward to obtain (the “Fat Chance” reward), while some are in the “Average Odds” category. Usually the FABKits tend to be the Fat Chance reward, while Decor items are Average Odds.
Remember that challenges are on a 30-minute cooldown, so if you don’t get your heart’s desire, try try again.
Architect (Back to Top)
Being an architect will allow you to really outfit your house in style. Probably a good fourth of the items in housing come from the architect. They are responsible for making the various tiers of resource improvements, some of the more rewarding challenge improvements, and a lot of the fancier decor items.
By the way, for all of you architects out there, I know it is hard to get all of the materials to make what you’d like. That’s why my friend Winterwind decided to take Survivalist and put a Mining Resource Plug on her plot. Because she set it to 50%/50%, friends (like me) would come by and mine it, and she would get a steady supply of the one thing she couldn’t directly collect.
Vendors (Back to Top)
Many FABKits and Decor items come from reputation vendors. Biomes all require the highest reputation (Beloved) from that zone’s subfaction to purchase them from the reputation vendor. There are also generally cheap building-block style pieces available for a low reputation and higher reputation levels gain access to more expensive and cooler-looking items.
There are some also specific vendors like the renown vendor, the prestige vendor, and the elder gems vendor that offer really cool FABKits and Decor items that match their particular currencies’ theme.
It should also be mentioned that there is the very obvious Housing Vendor that is part of the Housing UI, which we will talk about in the next section.
Housing UI (Back to Top)
When you are on your housing plot, a new ability bar pops up above your main Limited Action Set bar. This bar has all of the options you need for your house. Let’s go through them in order.

Landscape (Back to Top)
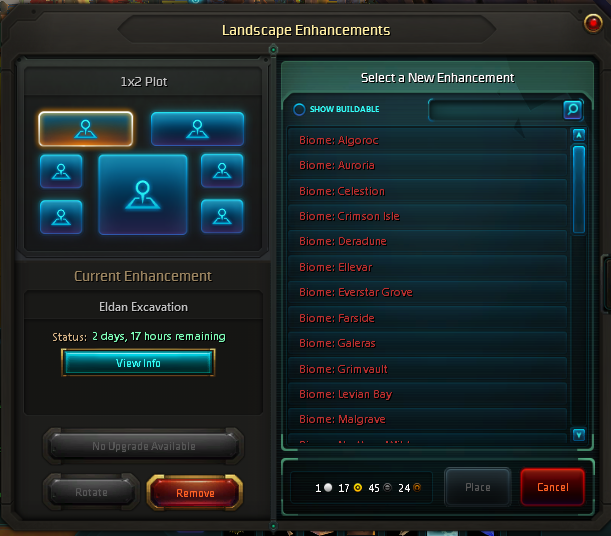
This is the map seen higher up in this guide, but as you can see, it is more than just a map. This is where you pick which house and improvements you want, as well as make important changes such as repairs and upgrades. To place a house or a plug, you simply select the area you want, and then select from the menu. There are various costs or requirements for most of the features.
Before you place your improvement, be sure to check to see what it looks like rotated, by using the Rotate button on the bottom left. This can only be used before you hit “Place” on the bottom right.
Upgrade (Back to Top)
For your Festival and Resource improvements, you will want to tier them up to better and better rewards as you go up in level. This is done in sequence, i.e. you must have Tier 1 before you can place Tier 2, and then you must have Tier 2 to place Tier 3, and so forth. There are also usually level requirements for each upgrade. Complete an upgrade by clicking the “Upgrade” button while you have the FABKit in your inventory.
Repair (Back to Top)
Every week, your plugs need to be repaired.
Currently, there is no way to pay several weeks at a time, though Carbine wants to eventually add that functionality. To repair a plug, you must select it and hit the “Repair” button. If the plug isn’t broken, then instead of the Repair button, there will be a “View Info” button with a status timer above it, showing the number of days/hours until the plug will need to be repaired again. If you hit View Info, it will show you how much it is to repair the plug when it becomes broken, allowing you to plan to have the funds on hand.
Remodel (Back to Top)

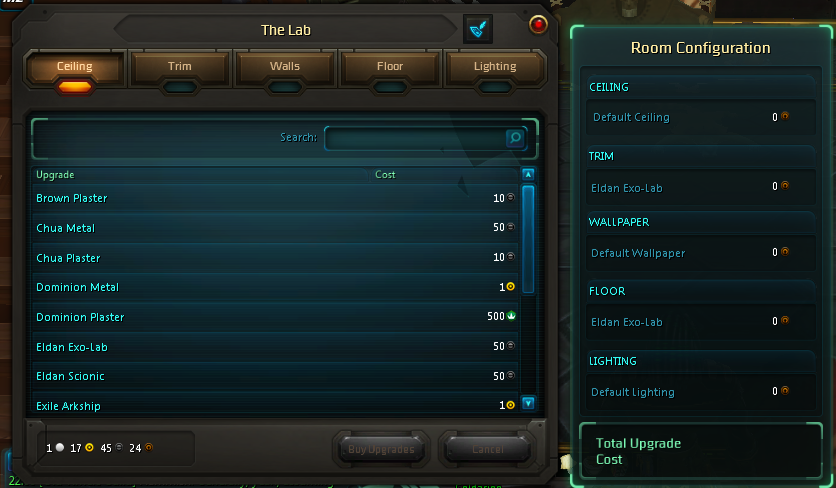
The second panel is the Remodel panel. On the face of it, it seems fairly obvious what this panel does. This panel allows you to change the inside and outside of the actual house to fit your desires. While outside, you can change windows, sides of the house, roof, etc.; you can even change the sky. Inside, you can change the trim, the ceiling, the walls, the floor, and last but not least, the lighting. You might be bored by lighting, until you realize you can create a black-and-white movie feel by setting it to Noir, or a western feel by setting it to Sepia, or have a smoky haze, or steam, or make it seem like you’re underwater, or…
Okay, I’m alright now. I really like that feature.
Residence settings (Back to Top)

Also within this panel is a tiny button that opens ANOTHER panel that gives a lot of benefits: the Residence Settings. This is where you name your house, set up your resource sharing ratio, and decide whether you even want visitors from the public or otherwise.
Crate (Back to Top)
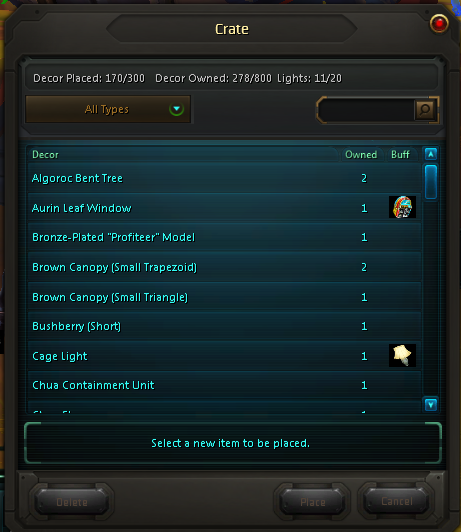
The Crate stores your Decor items for use at any time. When you remove them from your housing plot, they go to the Crate. You can delete them from the Crate by selecting an item and hitting Delete in the bottom left. You can filter the items by type, search for an item you would like, and attempt to sort by XP buff. I say “attempt,” because that functionality is a bit buggy right now.
At the top of the Crate, you can see the limits on decor items, and where you are on that limit. There is a limit of 800 items in the Crate, as well as an inside limit on placed items of 800 and an outside limit on placed items of 300. There is also a weird limit on total lighting items of 20.
“All hail the Crate.” While a bit off the beaten path, you may see this inside joke referenced occasionally on the forums or elsewhere. In Winter Beta, there was a bug that popped up a dialog box every time you logged in, asking “Are you sure you want to crate what’s there?” although there was actually nothing happening except the dialogue box. This spawned a small cult around the Crate, who treated it as their deity. It simultaneously received credit and blame for any following bugs or exploits. One popular catchphrase was “All hail Crate!” When this bug was finally fixed, Carbine referenced this cult with the patch note: “The Crate is dead. Long live the Crate.”
We have a great and weird community.
Vendor (Back to Top)
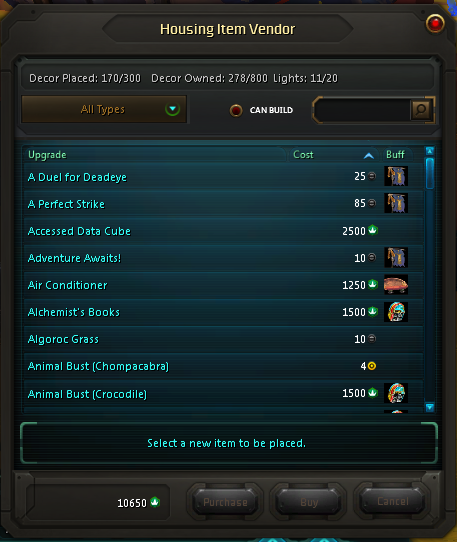
Similar to the Crate in design, the Vendor panel shows you what items you can purchase straight from the UI. Some items are for gold, some are purchased with renown, the social currency.
Basically all of the options and features of this panel are the same as with the Crate, except for a single button allowing you to filter to just see what you can afford.
As a quick side note, when you complete a Tales From Beyond the Fringe lore series, you will unlock the poster in the Vendor.
Placed decor list (Back to Top)
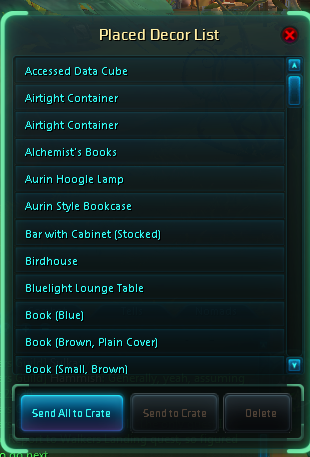
This allows you to see a list of everything you have placed in or around your house. It also allows you to send the item to the Crate, which is great for if you accidentally move something into a wall or something and you can no longer grab it. You can open this panel, find the item, then send it to the Crate for retrieval.
Edit mode (Back to Top)
This button toggles Edit Mode on and off, allowing you to safely right click on the terrain without activating an item and moving it or something.
Escape (Back to Top)
So you built yourself into a corner, eh? Never fear! Hit Escape, and it will port you back to the entrance. There is a 10 second cooldown.
Editor (Back to Top)

The editor in this game allows you to have fine control of where items are placed. Learning to use it effectively is a bit of a learning curve, but it is worth it. Initially, you can just right-click in the world, and the UI will do its best to place the item flat on the surface in the correct orientation. Depending on what you are doing, however, simply right-clicking in the world might not be sufficient. More control is available.
When an item is selected in Edit Mode, it has a little circle in the middle of it with a wrench. Click that to Toggle Prop Options.
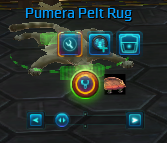
You will usually see three boxes, from left to right: Toggle Advanced Controls, Link Item, and Send to Crate. There is sometimes a fourth box (if the item has other items linked to it) called Unlink Children, which unlinks all the items attached to it. That will be on the far left. We’ll talk about linking more in a bit. You will also see a bar underneath that allows you to scale the item to different sizes. Finally, you will see a green circle around the base of the item, which allows you to easily rotate it.
Advanced controls (Back to Top)
The advanced controls are split up into several sections. The main attributes an item can have are its Position, its Angles, and its Scale (read: size).
Position (Back to Top)

The position section consists of arrows in the axes of the map (not weapons called axes, math axes), as well as exact measurements in each direction. You can use the arrows for to place an item, or you can try to get just the right distance by typing in the boxes. There are big arrows which move it faster through that direction and small arrows that move them in smaller increments for more control.
The way the axes are set up is kind of weird. Here is a diagram of the plane that is parallel to the ground.
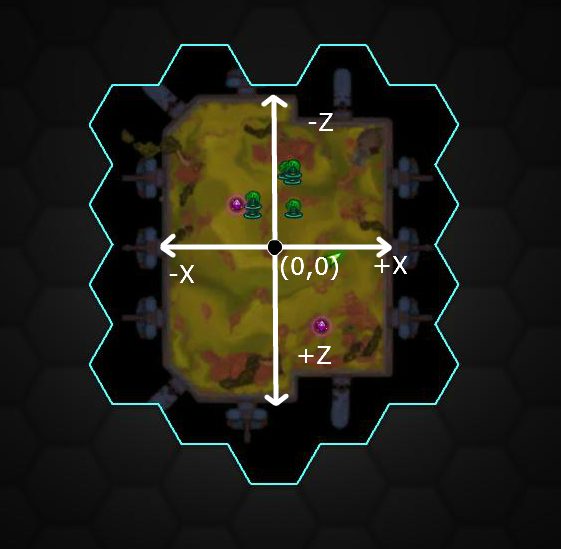
As you can see, when using the arrows, green corresponds to the distance from the ground, blue is the distance to the front of the house or housing plot, and red is left and right from center.
The weird thing is they don’t exactly line up with the boxes underneath them, which I think might be a bug. The height off the ground is the y-axis, and the distance to and from the front of the housing plot is the z-axis. The x-axis is still side-to-side though, so that is not as insane. The axes origins are all at the very center of the plot, right where your house is. Then they work like coordinates from that point.
Angle (Back to Top)
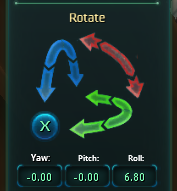
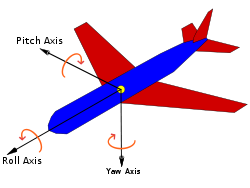
If you thought position was confusing, then you are going to really need help with the angles. There is a simple way to look at them, but first, I’ll explain what is going on. The tool uses something called Euler angles, specifically a kind of Euler angles called Tait-Bryan angles. For those of you with a math background like me, you’re moving along. Everyone else, think an airplane. You have pitch (nose down or up), yaw (turn left or right), and roll (do a barrel roll!). This allows for precise control over angles.
From Wikipedia.com
The confusing thing for a lot of people is the fact that the axes of position don’t turn with the angles, so if you move an item along one of the position axes, it moves the same direction if it is facing straight up or turned all which-a-way. However, the axes of rotation DO turn with the axes of rotation, i.e. rolling it does not rotate it with respect to the ground, it actually rolls it along the axis of the item, what we call a body-fixed axis. Again, think of an airplane. Rolling is rolling is rolling. It doesn’t matter whether the plane is pointed towards the horizon or the ground, if you roll, it rotates the airplane along the axis of the airplane.
If this is still confusing, turn on Advanced Mode (see below) and play with the angles for a bit. You’ll get the hang of it.
Again, there are large arrows and small arrows for large and small changes, respectively. The boxes underneath are really weird because they have the angles in terms of the axes of position, not in terms of the Euler angles. Rotation along the x-axis is called Pitch, and it will initially be affected by the blue arrows, until you start mixing angles. Rotation around the y-axis (remember this is height) is called Roll, and this is affected by the green arrows when no other angles are present. Rotation around the z-axis is called Yaw, which is red arrows when no other angles are involved. The numbers will always be with respect to those axes, so if the Euler angles are too much, use the numbers. The values are in degrees, and it switches to negatives when it hits 180° instead of continuing all the way to 360°, so it is very much like normal angles on a polar graph in math.
Scale (Back to Top)
Scale is simply the size of the item. You can make it huge or tiny. It is a slider, pretty simple.
Copying and pasting (Back to Top)
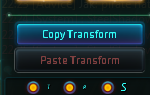
One of the coolest features is the ability to copy and paste various factors from one item to another.
First, you need to select which transformation you want to copy/paste. The three buttons underneath the Copy Transform and Paste Transform buttons allow you to choose which part of your item’s settings you want to copy and paste. The far left button is position, the middle button is angles, and the far right button is the scale. Select which ones you want to copy, then hit Copy Transform. Then select the item you want to paste it to and hit Paste Transform.
Advanced mode (Back to Top)
Advanced mode allows you to click on axes and rotations around the item to move it and rotate it. Because it rotates the circles that are used for rotation, it is much easier to see the Euler angles mentioned previously, and it is way easier to keep track of what is going on. You can disable either the rotation circles or the movement arrows by selecting or deselecting the Rotate and Move buttons above the copy-paste section.
Linking (Back to Top)
It is possible to build bigger creations from smaller pieces. Once you do this, it can be a pain in the butt to move them. One way to make this easier is the linking system. With this system, you can link a bunch of pieces to a “parent” piece. Then you just move the parent piece, and the other pieces move with it, the best they can anyway.
To use the linking system, you click on the wrench that is on the “child” item, opening the prop options. Click the middle button, which will pop up a dialogue box and tell you to right-click on the “parent” item. Once this is done, the link button will turn into an unlink button, and the parent item will have a new button that will allow you to unlink all children items from it.
Buffs (Back to Top)
There are two main sources of buffs from housing. One is Rest XP, which accumulates to give you 50% extra XP gains until you run out of Rest XP. The second is from the buff board right next to the entrance of your housing plot.
Rest XP is one of the best reasons to get a house. The items in it can give you bonuses to your rest XP gains while logged off in your house or on your housing plot. Not only that, but once you get to level 50, even though you don’t need XP anymore, you do still get Rested Elder Points, which is basically bonus Elder Gems (the elder game currency). Rest XP can also be gained from anyone’s house that you have as a neighbor. Simply log out at their house, and you will get their bonuses (source).
There is a great comprehensive guide on WildstarFans.net that sums this up so well that I don’t want to even detract from it by posting my own version here. Go check it out!
The buff board gives a single buff that lasts 24 hours. It gives you three different options for an XP buff. Two of the buffs are for 5%, and the third is for 10%. The options are PvP, Open World PvE (questing), and Group PvE (instances). Which one has the 10% buff rotates, so you can always get the buff you want, but the larger buff might encourage you to try something you haven’t before to fully maximize your use of it!
Neighbors (Back to Top)

When you make a friend, it’s cool to visit their house. Because Carbine is all about community, they built in a system to have a “housing friends list” called your Neighbors list. To make someone a neighbor, you can add them straight from the social panel, default “o.” From the neighbor panel, you can also make people your roommate, which gives them more permissions with items; they can help you decorate, I believe they can help with repair costs, and if you set up your permission settings for your resource nodes for roommates only, they will be able to harvest those as well.
Being neighbors with someone allows you to visit their home at any time.
When you are at someone else’s home, using the teleporter will take you back to Nexus, so if you want to return to your home, you need to hit the bottom left button on the neighbors panel to teleport to your house (no cooldown). The button immediately to the right of that allows you to see who has their housing plot set to public and go visit a random person.
Addons (Back to Top)
Finally, there are three addons that help with housing that I have found.
First, there is Neighbor Notes. This addon gives you a new panel in addition to the old neighbors panel, but this addon automatically tracks the plugs and resource types when you visit your friends’ houses. Can’t remember who had that vendor to sell stuff to? Well, just hit /nn and see who has the Vending Machine plug! You can also make an actual note on them in your interface as well.
Another great one is The Visitor. This addon lets you visit people who have their houses set to public, just by knowing their name. You don’t actually have to be neighbors with them.
Finally, made by a Carbine dev, Housing Decor Set Manager. This allows you to save sets of decor and place them where you saved them really easily. It also provides a shopping list of sorts to make it easier to remember what you used. Due to some API changes, it is buggy right now, but I am hoping it gets updated again soon.
Websites (Back to Top)
There are several websites that are good for figuring out what decor items and FABKits are available to you. Here are some of my favorites.
What architects can make: http://jac-ilt.wix.com/wildstararchitect
Decor and improvement sources: http://livinginwildstar.com/decor.php and http://www.wildstar-architecture.com/decor.html
Locations of drops, spawns, challenges, etc: http://jabbithole.com
For all lore items (for the Tales From Beyond the Fringe posters): http://dulfy.net/category/wildstar/zone-lore-wildstar/
And that is the guide! Let me know if you have any questions, comments, or corrections!

Have you ever considered about including a little
bit more than just your articles? I mean, what you
say is valuable and everything. However just imagine if you added some great photos or video clips to give your posts more, “pop”!
Your content is excellent but with pics and videos, this
site could certainly be one of the very best in its niche.
Awesome blog!
It’s hard to find your posts in google. I found it on 15 spot, you should build quality backlinks , it will help you
to get more visitors. I know how to help you, just search in google – k2 seo tricks