How to Harness the HUD, Part 2
This is the second installment of How to Harness the HUD. Today’s topic is the Quickslots and Social Options.
This will not cover keybinding the quickslots; that will follow in a later post.
Quickslots
The quickslots page is primarily dedicated to display and placement of quickslot bars. Let’s talk about the quickslot bars first.
There are six quickslot bars, each with 12 slots. These bars are for the purpose of holding skills and items for ease of use, especially in combat. Each bar is completely keybindable, and all of the bars except for the main bar have individual options for hiding them, docking them, and positioning them.
- Lock quickslot bars:
This is if you don’t want to move icons on your quickslot bars after placing them the way you like. I recommend this option, because I cannot tell you how many times I’ve accidentally dragged an item from my bag onto my bar, replacing an emergency skill. There is an option to keybind this in the Key Mapping page. I have mine mapped to Ctrl+Alt+q.
- Enable companion quickslot bar:
For captains and lore-masters, it is probably best to leave this on. This is the bar with all of the commands for pets, such as special skills, etc. I think the only way I would have this bar off is when have the pet is only summoned for its buffs (lore-master only, as the banners are better for the captain). This also has a keybinding, so I could see toggling it on and off for screen real estate issues.
- Always show bar X:
- There are 5 of these, one for each of the bars. If the box is checked, the bar will not need to be toggled and will always be on your screen. If it is not checked, the bar will be hidden and will need to be toggled. Fear not, each bar is capable of having a key bound to toggle its visibility.
- Default setup is for each of the first three bars to be always visible. I generally have two bars or less visible besides the main bar. Usually, I will display emergency skills, skills that need to be used as soon as they are off cooldown, and on-defeat skills. My lore-master, for example, has all of his crowd-control and emergency skills like Wisdom of the Council displayed. My captain has all of his heals and on-defeat skills displayed.
- Note: For PvMP, I usually have all of my skills displayed on melee classes. My warg, for example, is able to chase down Freeps and maneuver better when I can focus on using my fingers for forwards, backwards and directional and use my mouse to click on Freeps and skills.
- Make bar X horizontal:
If the box is not checked, the bar becomes (you guessed it!) vertical. Pretty self-explanatory.
- Dock bar X:
The bars will dock to the main bar and become locked there.
That is pretty much all there is about that page.
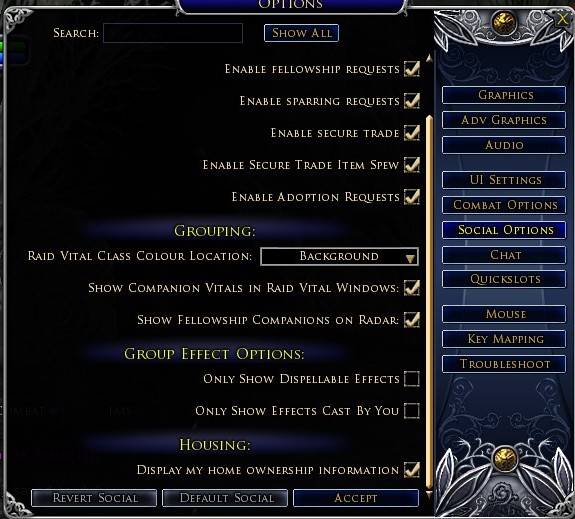
Social Options
This page is responsible for a lot of random options. You would think this might have something to do with chat, but no! There is a Chat Options page too. My rule of thumb is if you cannot remember where a particular option is, look under Social Options or Combat Options page, because it’s probably there.
There are a lot of options here, and most are pretty self-explanatory. The ones I really want to point you to are the Group Effect Options. This has two checkboxes that are extremely important.
- Only Show Dispellable Effects:
- Read this as “Show debuffs on fellowship members that can be cured by someone.” This is a must for classes that can cure deleterious effects, i.e. captains, lore-masters, hunters, and minstrels. This essentially removes everything underneath your fellows’ bars except effects that can be cured (this does not affect your effects). After all, there is very little reason to see things you can’t do anything about.
- Note: If you are in certain instances where dispellable effects are not a real concern, occasionally, there are effects that will indicate that one party member will need more healing than normal (such as the Acid in Turtle, or the massive bleeds in Sari-Surma). You might want to toggle this in that instance. Healers typically aren’t in charge of removing effects anyway.
- Only Show Effects Cast By You:
Read this as “Show buffs on fellowship members that you cast.” This overrides the previous option, to the extent that if you have both checked, then you will only see dispellable effects and the buffs that you put on. I would say that captains absolutely need this on, and minstrels probably shouldn’t have it on. Reason being, is that captains’ buffs are long term, from 5-30 minutes. It is useful to see that someone’s buffs have expired, so you can click it and forget it for a while. Minstrels on the other hand, have their buffs mainly in combat, and they last much less time (I believe only 30 seconds or less, but I could be wrong, my mini is level 43). This may all change with the minstrel changes coming, but we’ll see.
That is all for the Quickslot and Social Options pages. Stay tuned for UI Options and a detailed post on Key Mapping and those options.


They fixed the Show dispellable effects override problem. You can now have both Options selected, and they will show up on separate rows. These are great tips for new or inexperienced players, btw. I haven’t seen many guides on what people should do with their options, and find myself explaining this stuff to level 65s all the time.
Yeah, especially when people solo up to level 65 which is completely possible. I was surprised several times recently by people not knowing where to turn on the target assist window, etc. Glad you like it, and thank you for the comment!